mrjonthehat's collection of handmade instruments, with descriptions, video clips and guides to building Cigar Box Guitars, Canjos, Dulcimers, Cajons, Whamolas and other fun items. To buy an instrument - Leave a message here, or on facebook, or e-mail mrjonthehat@yahoo.com - Please browse the older posts in the archive. Cheers.
Can a bass guitar be made using the cigar box guitar making technique? If you have a big enough box, a good piece of hardwood for the neck, and maybe a resonator perhaps? Here's what I built...
Basics taken care of
Tone and volume pots wired and fitted
Clamped and glued...with improvised counterweight !
The finished bass
- Here's a short video, made just after I strung it...
Just like a CBG, but with Ukulele Fretboard, either stopping at the box, or overlapping in a recess.
I have piezo pickups in all the ukes i make. Steel or nylon strings.
I tune tenor tuning, because I like it, and am used to playing the mandolin. (GDAE low to high). More conventional tunings are gCEA and aDF#B (which sounds brighter to me.)
These Ukes were made using the legs of a discarded easel
I realised that the box below was too long, so moved the neck INTO the box.
It now belongs to Nicolette, AKA Little Wing, from Glasgow supergroup
2.Get empty Cigar Boxes from a cigar shop or junk shop / ebay
3.Pick A Box
4. Get some 3' X 2" X 1" Hardwood. planed smooth. Flooring, furniture, easels, signs, you'll find some. Timber merchants are a last resort. A bench saw, and an electric plane help create your 3ft 2X1s. I have a friend who will cut the timber for me in return for a guitar, or some of the wood I find...
5. Get some Fretwire - £2/metre (online), or from a guitar shop.
6. Snip frets to size, (Cut one that's the width of your guitar neck, then use it to mark out where to cut the rest of the roll of wire), and mark the fret positions from a template onto the neck or a separate fretboard piece of wood. (Length from template, Width the same as your neck timber, and 4-6mm thick), Make sure the timber is long enough to fit through the box with an inch long tailpiece, and a headstock that will be big enough for your tuners, and not too long, or your strings wont reach them. (I made that mistake once !) This page is excellent for fretboard templates: CLICK FOR FRETBOARD TEMPLATES
*A mitre box helps cut straight fret grooves
7. Tap frets with mallet, into carefully sawn grooves. A fret saw, gents saw, or hacksaw, and a mitre box will work best. Keep your grooves straight, even height, and 2mm deep, depending on the fretwire 'tang' (the bit that goes in to the fretboard). You should snip them closer to width than I did in this picture!
8. File the frets to width of neck / fretboard. Round off sharp edges. Make sure they are at an even height, and not scratched. Steel wool will help.
9. Cut / chisel out the slot for the neck in both the ends of the cigar box, centred, and just under the lid.. Using a small offcut from your neck timber helps get the size right.Take care not to splinter the wood.
10. File / sand a groove in the neck, where it will attach to the lid, so the box lid will close snugly. An orbital sander or router is quicker.
11. Position the box, and glue the lid to the neck.A heavy book may help keep the box secure. You may want to cut the headstock before you apply the glue and fit the box, so it doesn't get damaged.
12. Saw the Headstock, (A 45 degree cut just above the nut, then a straight horizontal cut from the end of the neck to your 45 degree cut, making two halves.) - SEE THE PICTURE - and glue the cut piece to the underside, so the original planed sides are in contact.
Strong wood glue that sets hard, without flexing is essential.
Glue a 'nut', made from bone, metal, plastic, (I like to use a sawn off threaded bolt), in a filed groove, at the top of your fretboard. It should clear any frets by a couple of mm. Carefully saw / file grooves for your strings into the nut, evenly spaced, and not too far into the bone / plastic / bolt
13. Sand the headstock, so tuners will protrude far enough for strings to be threaded, clamp, with cardboard next to the clamps) until the glue dries. You may also want to glue and clamp a separate fretboard too.
14. Drill holes for the tuners, position ferules, and screw them in place on gthe back of the headstock. Make sure you can turn the tuners, so don't drill too far from the edge. Always drill smaller guideholes before screwing in to the wood, and starting small and increasing drillbit size when making holes. The ferules (peg holders) should be tapped in place with a rubber mallet. - A block of wood under anything you drill will prevent splintering.
15. Solder a pickup / socket and optional volume control pot (see below) Click here for great wiring / soldering diagrams Glue pickup to underside of neck, and drill holes for socket and control. Screw them in place.
16. Add a bridge, made from anything you fancy, with grooves cut to hold the strings an even width apart. The bridge should be positioned SO THE DISTANCE FROM THE NUT TO THE 12th FRET (ie. where you find the octave of your string when plucked) IS EQUAL TO THE DISTANCE FROM THE 12th FRET TO THE BRIDGE, a slightly angled bridge (nearer the neck for the high strings) improves the sound when playing with a slide. Don't glue the bridge. The string tension will hold it, and you may need to adjust it a fraction, until you get the position right. Cut some soundhole(s) - A sound hole cover is optional. I use eyelets or brass grommets (from hardware stores) glued on my drilled sound holes, as they look good, but you can drill holes, file shapes, or make metal resonator plates, to give your CBG a dobro sound.
17.Drill holes in the end of the neck, add eyelets (for shoelaces etc. from most hardware stores), if you want to. They help stop the strings from cutting into the wood.Your strings will be anchored here, threaded through the holes, and tied, looped, or held in place (ball ended strings will work if your holes aren't too wide.
18. String, tune and play (see my guide to tuning), Strings may feel too slack or tight (be careful), when trying different open tunings, but you need to experiment. Try a thicker or thinner string THERE ARE NO RULES, remember. Check the frets don't 'buzz' - You may need to make the bridge higher, or tap a few frets so they are level. The 'action' or distance between strings and frets should be a couple of mm, but you should be able to comfortably play notes and chords all along the neck. Slide playing is better with a high action, but you might find it harder to play fretted notes. Trial and error is the key, file / sand a little bit off your bridge, or make the string grooves in the nut and bridge a fraction deeper, if the action is too high. If it's too low, replace the nut or bridge, or try a thin piece of wood / a thin cable tie under the bridge.
19. Add fret markers if you need them. Frets 3, 5, 7, 9, 15, 17, 19 can get a dot on the fretboard, or along the side of the neck. Use a permanent ink Sharpie, or drill shallow holes for dots. (I punched circles from tortoiseshell guitar picks with a paper punch), Fret 12 is the octave, so 2 dots is the norm. If you've set up the CBG correctly, a string tuned to A should also be a perfect, in tune A when you play it fretted at the 12th fret. If it's lower than an A, try moving the bridge towards the neck, if higher, towards the heel, until it's right. If you positioned the frets correctly, everything will be in tune.
Here's how this one sounds : Every CBG is unique. Yours will be different to the one in my video below, but you will love the result when you get it right. It should have been a cheap, fun, and not too tricky experience. And you've got a cool, playable instrument, you made yourself.
You don't need frets, electrics, fancy sound holes, marker dots, or matched tuners. Just a box, a stick and some strings. Please get in touch if you need help, or if you can help me. Cheers.
A Wooden Box (Ask in a tobacconists / cigar shop. They usually have empty ones. I make a donation to charity, and take as many as I can carry ! - Junk shops / Charity shops / friends...) A Piece of Wood (Aprox. 3' X 2" X 1") - I've used legs from easels, furniture, floor timber, walking sticks, hockey sticks... It's handy if you can get them sawn and planed to size (Cheers Simon at WASPS). Hardwood like oak, cherry, wenge is best, as it won't bend. Some guitar strings. (Top 4 or bottom 4 work...Try other combinations too.) Some guitar tuning pegs Wood / metal / bone / plastic... for a 'nut' and a 'bridge' Screws Optional Piezo transducer pick-up (£1.09 each from MAPLINS or similar store) Mono Guitar socket Ferrules (to hold the tuners) Fretwire Wood for fretboard Strap Button Marker Dots Eyelets Soundhole grommets
Tools
Hacksaw Workbench Clamps (with cardboard to protect wood) Files Sandpaper / Rotary Sander Power Drill (With Assorted Bits) Snips Ruler Fretboard template* Pencil Mallet Wood Glue Mitre Box Soldering Iron & Solder Wooden Block (Useful for drilling to prevent wood splinters and for holding components when soldering.) * If you are adding frets, a template is very helpful for getting the position right. These can be found at the Handmade Music Clubhouse site : Handmade Music Clubhouse or you can make a template from any guitar or banjo. There is a useful link in my step-by;step building guide.
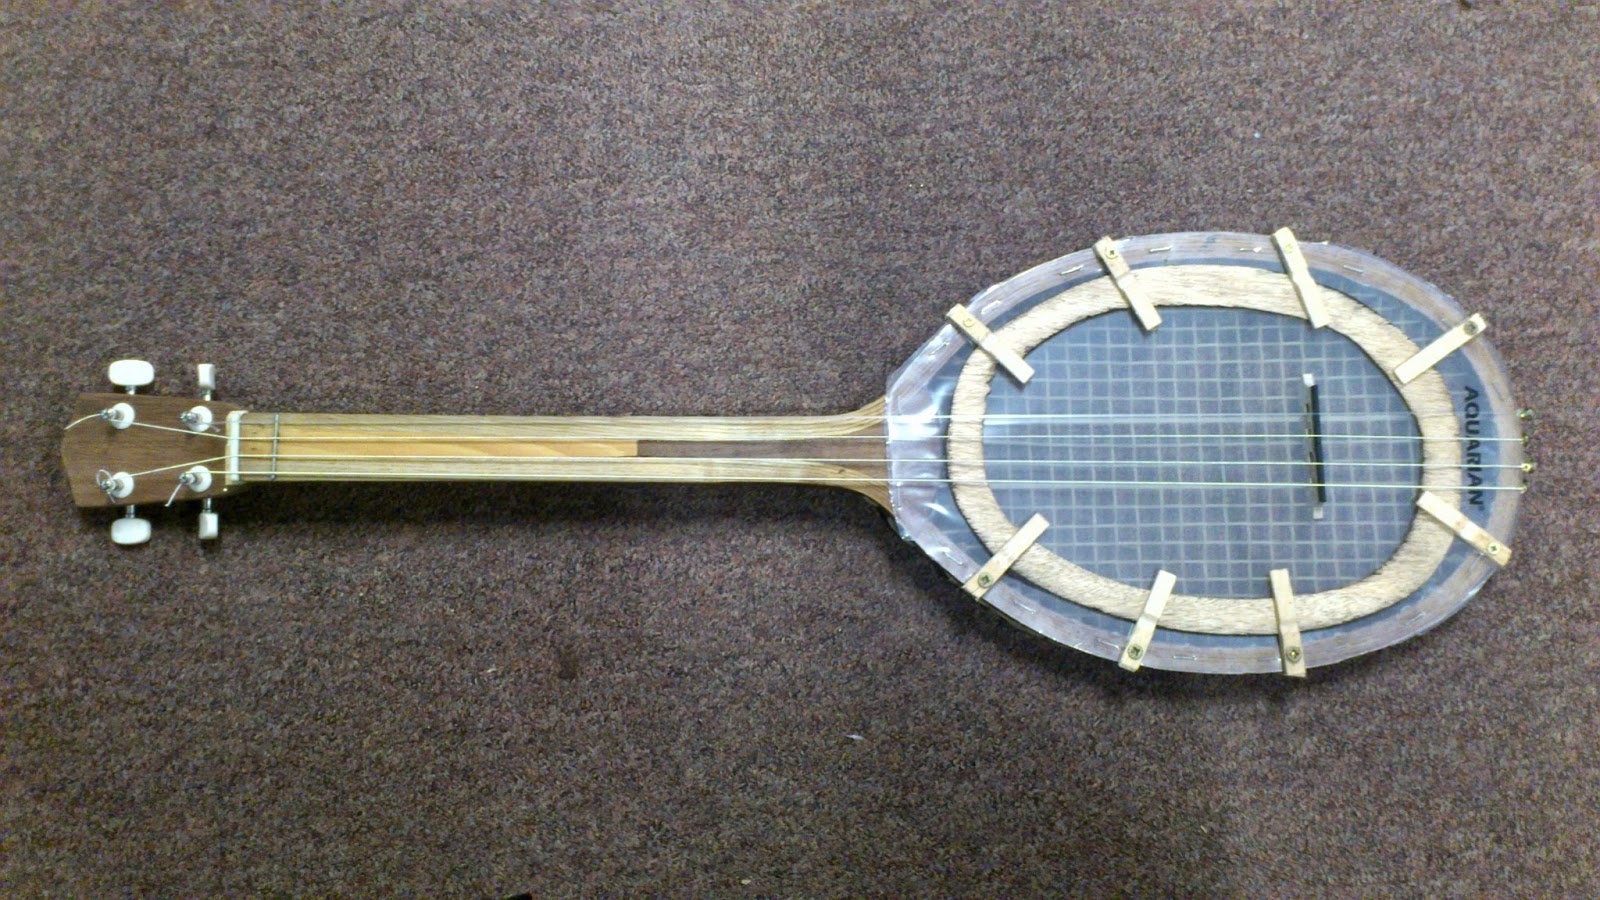
This was the first weird instrument I made: A banjo from my dad's old 1950s wooden tennis racquet : I was inspired by the brilliant Dennis Havlena, and this link :Dennis Havlena's Website
I planed down the handle, glued and stapled a drum skin to the frame and cut a wooden 'tension ring' which is held in place using pegs screwed in to the racquet (being careful to avoid the strings).
I glued a fret at the top of the neck, and made a simple 'nut' by drilling three holes through a piece of scrap wood. I cut away a simple 'headstock' piece and attached an old guitar tuning peg and two screws. - Two more tuning pegs were added to CAREFULLY drilled holes at the heel end of the racquet, plus another screw.
I used 3 ukulele strings and the bridge from an old guitar.


.JPG)


.jpg)

.jpg)
.jpg)
.jpg)


